Search This Blog

Friday, December 20, 2013

How to use programs in Fullscreen mode in Windows7 and higher OS?

For this post, we take the reference of Borland C as our desired computer program.

Borland C was originally a program developed for 16-bit computers. Today's modern computers generally come in 32-bit or 64-bit architecture. While older operating systems(OS) like Windows XP supports running of old applications freely in full screen mode, the newer versions of OS like Windows 7 and higher DO NOT support full screen by default.

For most programs, it is possible to change compatibility by right-clicking the application, selecting 'properties' and using 'window mode' instead of 'fullscreen'. But that is only a temporary solution. In programs such as Borland C, that is possible but NOT FEASIBLE because it certainly opens the program but you wont be able to RUN it. (i.e The black screen output wont appear)

The ultimate solution to this and many more older programs that are based on a 16-bit architecture is the use of DOSbox. DOSbox is a revolutionary program that can partially emulate an older computer. In simple words, DOSbox creates a 'older computer' inside your computer. In that mode, the program will work just as good as it would work on a 16-bit system. It is fully compatible.


Download links:

[Mirror]: DOSbox (official file mirrored)


[Mirror]: Borland C (mirror: original file)


How to use DOSbox?
After you install DOSbox, an icon like this will appear on your desktop.
Just click on that and a DOS based console like the one shown below will appear!


Here, [Z-drive] is the virtual drive that represents the 'old computer' created by DOSbox. It has limited resources, which can be adjusted if you desire.

To use any program, you must first MOUNT it in DOSbox.

Basically, mounting means creating another virtual drive. DOSbox has only one virtual drive [Z-drive] at the begining. For DOSbox, there is no C-drive, D-drive or any other drive in your computer.

How to Mount?
 
If your program is in this location:  D:\BorlandC\bin\bc.exe  
then you should first mount D-drive.

To do this, type  Mount d d:\  in DOSbox and hit Enter key!
Then, you should get a message after this.


The command   Mount d d:\  will create a virtual D-drive and load the path D:\ inside it. That means the virtual D-drive will also have everything inside D:\ (which is the original D drive)   

You can change  to any other letter to change virtual drive letter.
 d:\  is a path and it MUST exist in your computer. Since my program is stored in D:\BorlandC , I chose D:\ as my path. You can choose a different path for your computer.          

Now to open that program, first go to the virtual drive you just created.
I created 
d:  so I simply type d: and hit Enter-key
After you hit enter, you will enter that drive. Look I just entered D-drive. Previously I was at Z-drive.

To open the program, simply type its path.
For me that is, D:\BorlandC\bin\bc.exe 


Now as you hit ENTER-key, your program will open.
You can use it in Fullscreen mode by using the key combination  Alt + Enter   

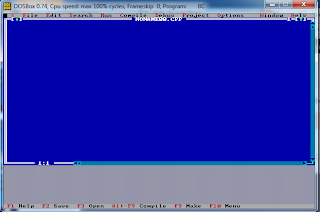
Borland C opens like this (In its default mode), 


you can start using it by using the key combination  Alt + F + N  which opens a new file to start working with!

It should look like this:


+This part of the article is added because a friend of mine pointed out something really interesting.
 

He asked:  Do I need to give the source path Every time " .

The answer is Yes if you follow this method. But after you get acquainted(familiar) with this method, you can try a simple trick to make this happen automatically. It is a simple batch processing trick that commands DOSbox to perform a series of actions.

To automate this Process for future use, refer to the follow-up post here!

Any Queries? Any Confusion? Need help?Feedback?
Just Drop a Comment!


How to Automate DOSbox? - GLP exclusive solutions!

DOSbox is a really VERY useful application. No one can deny that simple fact. But users will admit that opening, mounting and loading a program every single time is quite tedious and frustrating. To overcome this problem, GLP brings you a nifty trick to automate the programs that you use frequently.


A simple process will be explained in this post. You do NOT need any programming concept to do this. Just follow the instructions.

Okay, first if you are unfamiliar with DOSbox, please check out THIS POST at GLP.

We will be learning how to open BorlandC automatically in this post. You can replace the path to open your desired program in the same way.

 Step1: 

open notepad and type the following:


mount d d:\
d:\borlandc\bin\bc.exe
pause

then save as  BCM.bat 


 Step2: 

Now, put the file  BCM.bat  inside the main folder where you have installed DOSbox.

I installed my DOSbox in  E:\Installed\DOSbox  so, my path is:

 E:\Installed\DOSbox\DOSBox-0.74  <- This is where I would keep BCM.bat


 Step3: 


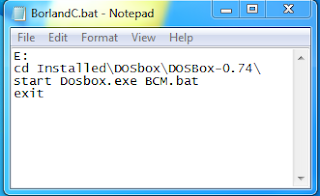
Open Notepad again, and type the following codes:

E:
cd Installed\DOSbox\DOSBox-0.74\
start Dosbox.exe BCM.bat
exit

then save it in your  Desktop  as  BorlandC.bat 

 Step4: 


You can now double click on the  BorlandC.bat  icon from your desktop to run Borland C. It will automatically open Borland C through DOSbox.


By following these  four steps , we can open any application through DOSbox automatically.

+ Full Screen support in Windows7


Hope you enjoyed this post! If you have any queries, problems, confusion, feedback - Just drop a comment below! Thanks!


Walkthrough: How to put Facebook comment box on blogs!

A brief walkthrough on the process of creating facebook comment box on blogs. 


Copy the highlighted part in your blogger template.

Note: It should be ONLY ONE. Don't do it if u have already done it before!


Instruction1:

On the html tag that looks like this:

<html b:version='2' xmlns='http://www.w3.org/1999/xhtml' xmlns:b='http://www.google.com/2005/gml/b' xmlns:data='http://www.google.com/2005/gml/data' xmlns:expr='http://www.google.com/2005/gml/expr' xmlns:fb='http://ogp.me/ns/fb#'>

Just paste the part highlighted in blue to the code that looks like the one above in your blog's template.


Instruction2:


Now copy the highlighted part just below the <body> tag .. find it by searching (Ctrl+F) the term "<body "

Copy/Paste the code from below! (highlighted blue+green)

blue part is the structure code. Some sites may give slightly different 
alterations but this one is 100% compatible for all cases tested so far!

green part is my own fb app called 'Commenterata'

<div id='fb-root'/>
<script> 
//<![CDATA[
(function(d, s, id) {
  var js, fjs = d.getElementsByTagName(s)[0];
  if (d.getElementById(id)) return;
  js = d.createElement(s); js.id = id;
  js.src = "//connect.facebook.net/en_US/all.js#xfbml=1&appId=573472319372353";
  fjs.parentNode.insertBefore(js, fjs);
}(document, 'script', 'facebook-jssdk'));
//]]> 
</script>

Instruction3:

Optionally, you can add a recommendations bar too by pasting the highlighted text given below. You have to paste it just below the code given at the previous instruction.

<div calss='fb-recommendations-bar' data-href='https://getlostproblems.blogspot.com' data-readtime='30' />

Now, 
  • replace https://getlostproblems.blogspot.com with your own website.
  • replace 30 with your desired time in seconds. This is a delay limit. If the user stays in your page for 30 seconds, facebook will automatically recommend some other pages to read. See a live example at this page.

Instruction4:

Now on your dashboard, go to Layout and select "Add a Gadget"


Instruction5:

Keep scrolling down until your reach 'Html/Javascript' title. Click on


Instruction6:

 Finally, add the code below here:

<div class="fb-comments" data-href="http://getlostproblems.blogspot.com" data-width="650" data-num-posts="10"></div>

Now, 
  • replace http://getlostproblems.blogspot.com with the page URL where ou want the comments to appear. 
  • To make the comment box active on THIS page that you are currently reading,
    I replaced the given URL with http://www.glpnepal.blogspot.com/2013/12/createFBcmntBox.html 
  • replace 650 with the width of the desired comment box. Recommended to be much less than the width of the page.
  • replace 10 with number of comments you want to display at once.

EXTRA NOTES:


  • Instead of following Instruction4 and onwards; You can just follow the first 3 instructions, then when you create posts, select 'HTML' near the 'COMPOSE' tab. Then add the code given at Instruction6 at the end of your HTML codes.


  • Important Note: After you paste this code, NEVER EVER save or select preview the page before publishing the page because fb registers a URL only once. If it is found offline on the first try, it wont be live and working later.


  • FEEDBACK
      Think something is still missing in this post? Tell us your problem/opinion. We'll fix it right away!

      Tuesday, December 10, 2013

      Top 5 Youtube Tricks to make 'youtubing' more awesome than ever!


      GLP brings you a list of the coolest Youtube Tricks to make youtubing more awesome than ever!! Get ready, I know you'll simply love it! I certainly did. So go ahead and read below.


      Trick #001: Set a Specific Start Time


      Most of the time, while sharing a video, u want people to focus on a certain specific part of the video. You usually do this by asking them to start the video from a certain point manually. However, this feature can also be made automatically. You are wondering how?


      Its simple:

      Lets say, you're watching this video:


      Now, simply add,  #t=01m20s  at the end of the link & share!


      For example; you need to share:

      to start a video from 1 minute and 20 seconds.


       Trick #002: Set an Auto Replay Video


      Want to keep repeating the video playback? Simply replace  youtube  with  infinitelooper  in your link.


      For example; this link:

      should be written as:


      Trick #003: Super Boost Video Speed for Slow Connections


      Have a slow internet connection? Tired of 'buffering' signs that pop out frequently? Want to stream videos faster? Well here's a solution.


      Many users might not know but Youtube has announced a new feature specially aimed at users with slow internet connection. Its called 'Feather'. As the name suggests, it makes streaming, light as feather.

      Your video speed is directly proportional to the number of bytes sent and received. 'Feather' mode removes all unnecessary data to give you ONLY pure videos and a tid bit of ad that is customary of a FREE service. That also means that some options are removed for that feature. But the overall streaming will see a positive result! :)


       Click here  to Try 'Feather' today (its currently in beta mode) ;)


      Trick #004: Smart Accu-Search

      Youtube has a LOT *I cant stress this enough* of videos. It is said that if one tries to watch all of them continuously, they wont finish for a good 3 century! (300 years of continuous videos). In such a platform of videos, searching a desired video may be a hassle.

      But worry not, GLP brings u a solution. When ever u search for a video in Youtube, simply add   allintitle  at the begining of the keyword. This features to you, only the videos you asked for, no nonsense ;)


      For example, instead of searching:
       nepali movies 

      try searching:
      allintitle nepali movies 


      See the difference ;)


      Trick #005: Magic Actions for Youtube

      Here, there's something for the broadband users too! If you have a fast internet connection & enjoy watching videos in HD everytime, you can get an add-on for  Mozilla Firefox ,  Google Chrome  or,  Opera 15+  Its called  Magic Actions For Youtube  . Once you install it, enable HD option to enjoy HD. Always!

       +Very Cool Bonus featues like: 


      • Auto HD: Changes video to your desired video mode automatically.
      • Cinema Mode: Shades background for full video focus.
      • Adblock: blocks all annoying ads and pop-ups.
      • Volume Control: Scroll mouse to change volume easily.
      • Cool Day/Night Toggle: Shades youtube theme to white/black.
      • Watch delete view history.
      • Show enlarged avatars in comments and country flags.
      • Expand videos to full window size.
      • Auto Replay a video.
      • Hide Annotations(those annoying comments in the middle of the vid)
      • Auto hide player control: Controls are hidden, appear when u hover mouse over them.
      • Block/Hide comments if they annoy you.
      • Over all - Feels like one super awesome upgrade to youtube!
      • Its a youtube, you've always dreamed of! Try it and be amazed! ;)
      Download Links:


      Last but not the least: 

       #a Bonus 
      This is an old age trick, but it could be new for some users who were unfamiliar with youtube a few years ago!

      Add  &fml=5  at the end of Youtube video URL to solve high buffering rates.

      Example: 
      for this link: http://www.youtube.com/watch?v=U8STgCviLe0 


      the link will be:
       http://www.youtube.com/watch?v=U8STgCviLe0&fml=5 


      Friday, December 6, 2013

      How to make full screen support in windows 7 ?

      Windows 7 is a great OS to use in general sense. But it does not provide the comfort and flexibility that XP does to programmers. Windows 7 does not support full screen mode, which renders several programs useless.

      Some very useful programmes like QBASIC & Borland C can only start but not be able to run properly in Windows 7. This is because both are designed for older computers having a 16-bit architecture. Today's modern computers have 32-bit or 64-bit architecture of processors which cause compatibility problems.


      The best way to overcome this problem is to create an 'old computer' inside your new one. There is a nifty tool called DOSbox that allows you to do it.


      DOSbox makes a virtual 'old computer' inside your computer which lets us use older programs without a hitch. Its 100% compatible!
      + its 100% FREE!


      To know how to use DOSbox, click here!


      DOSbox can also be automated. You can automatically load the desired program with this trick.

      To know this trick, click here!


      Any Queries? Comment below!

      Sunday, November 10, 2013

      Get PAID with Refban

      Hey guys, its been too long since my last post here. But as usual, I bring you something really interesting. Wait till you get a whiff of this awesomeness. I am gonna tell you a way to earn money online today. If you own a blog or a website, you can now earn as much as 0.05$ daily JUST FOR SHOWING advertisement in your blog. You can also refer this to other people and earn MORE from their referrals. Yes, its possible with REFBAN. Now JUST DISPLAY IT & EARN. Any bit of FREE cash never hurts right? So just click on the link below and put your code online and start earning.


      CLICK HERE TO APPLY FOR REFBAN & START EARNING GUYS!!
      The payout is comparitively low, but it is 100% legal. I hope it helps you. Waitin' for your feedback!


      Monday, August 19, 2013

      Facebook Trick : How to Easily invite ALL friends in a event? or to Like your Page?


      Let's learn this one practically. If you can follow the steps below, you can definitely do this for your own page. Okay then follow the instructions below, 

      and 

      click on the images below to enlarge them!


      Instruction1:

      Go to this page &amp; like it : https://www.facebook.com/no2uniform

      Then click on the "See All" link in invites tab.


      Instruction2:

      Click on "Recent Interactions" and mark on " Select All Friends" in dropdown category.

      Keep scrolling down until you have the passed by the name of every single one of your friends.

      Now, if you are using 
      Google Chrome
       or its variant (Like Torch Browser):
      Press Ctrl + Shift+J

      If u r using 
      Firefox:
      Press Ctrl+ Shift+K

      A console window should open . See next image.


      Instruction3:

      Click on "Console" tab in your opened window.


      Instruction4:

      Paste the code below in console & hit enter!

      javascript:elms=document.getElementsByName("checkableitems[]");for (i=0;i<elms.length;i++){if (elms[i].type="checkbox" )elms[i].click()};


      Instruction5:

      After some time, you can see that all your friends have been selected!

      Now close the console window only.


      Instruction6:

      After closing console window, click on "Submit" button


      Instruction7:

      You should get this message after following all steps. If not, please try all these steps with Mozilla Firefox or Google Chrome, or Torch Browser. 


      Wednesday, August 14, 2013

      Easiest way to Take Ownership of a File in Windows.

      Taking ownership of system files or folders in Windows 7 or Vista is not a simple task. Whether you use the GUI or the command line, it takes far too many steps. 

      Thankfully somebody created a registry hack that will give you a menu item for “Take Ownership” that will handle all the steps for you. (If you are the person that originally made this script, let me know and I’ll give you credit) 

      Here’s what the new right-click menu will look like after installing this registry hack.


      Install Feature:
      Download and unzip the files contained in the zip file. Double-click the InstallTakeOwnership.reg file and click through the prompts. No reboot necessary.

      Uninstall Feature:
      Double-click the RemoveTakeOwnership.reg file and click through the prompts. No reboot necessary.

      CLICK HERE TO DOWNLOAD TAKEOWNERSHIP.ZIP FILE

      Why should you know how to take ownership of a file?
      Well first and foremost, its because you own the OS that you use and you should be able to handle/modify all tasks in your OS. Wouldn't you agree?
      Second reason is, sometimes some files will refuse to budge/modify or even read when you really need it. That's because those files are generally protected by the highest level of authority in the computer. So, if you wanted to edit a few components ina file to make youtube load faster, or maybe increase the speed of the internet you are using via a simple trick , then you would have problems if you do not have access to the files you want to manipulate.


      Any more questions/queries? Please comment


      Saturday, August 10, 2013

      How to change your IP address? Use of Proxy

      It seems many people are trying to find ways to change their IP address, what with country-wise url blocking and all. Well  GLP  brings you a nifty solution once again!

      Firstly, changing the IP address depends upon the way you want to use it. It can be classified into two categories and some sub categories:
      • Changing the IP address of the whole Computer
        -This includes, torrent managers too!
      • Changing the IP address of specific browser(s)
        -Changes IP for a specific browser or a set of supported browsers.
        *This can be done Automatically.
        *Or, it can be performed manually.
      A) Changing the IP address of the whole computer:
      If you want to change the IP address of the whole computer, you can do it with the help of a software called hotspot shield. Simply download and install it. Restart your PC, open the program and you are good to go!

      Download Hotspot Shield!(Freeware with Ads)
      Mirror: Official Site
      If you have problems with this, please mention in the comments, I'll create a detailed walkthrough of this problem if there are many requests! 

      B) Changing the IP address of specific browser(s):

      *Automatically changing it:
      You can change the IP address of a specific set of browsers with the help of these freeware :
      (1) Ultrasurf  
      Download Ultrasurf

      Mirror: Ultrasurf Official Page
      (2) Freegate 

      Download Freegate
      Mirror: Freegate Official Page

      By default, the IP address of Internet Explorer is changed, but it can be integrated to work with chrome and firefox as well.
      Sometimes, integration is not successful due to version problems. You can follow the manual method then!


      *Manually changing it:
      You can manually change it with the help of mozilla firefox browser (or any other browser that has inbuilt proxy function ). 
      Go to http://www.hidemyass.com and then:

       Click on the pics below to enlarge
      US IP filter settings sample
      Select the IP address at the top. Use the Port number too, if required!

       How to apply these settings in different browsers:


      • select a country that you want to change your IP address into. 
      • Sort the IP address with highest network strength(low ping, preferable latency). 
      • This will give you nice internet speed even with poxy.


      Now, steps to apply the IP address in firefox:
      • open the firefox browser, press  Alt , the menu list will be visible at top. 
      • Select Tools > Options. A dialog box will open.
      • On the Advanced Option > Network Tab > Connections > Settings.
      • The connection settings dialog box will open.
      • Deselect Auto detect and mark on Manual Proxy Configuration.
      • I've put the IP address : 222.124.15.123 for Thailand. You can put the IP address of any other country you desire. 
      • Now, click "OK" and you are good to go.
      • From now on, your Firefox browser will run through the IP address that you used. You can undo this anytime.
      Ask me questions in the comments for any support information or problems.

      COMMENTS:

      Sunday, July 28, 2013

      GADMEI USB 2.0 TV BOX - Software + Driver for Windows XP / Windows Vista / Windows 7

      All CRASHED Links have been fixed! Please NOTIFY us in comments if they crash again!!
       This is a tested & working fix for GADMEI UTV332E / UTV330E 

       GADMEI USB 2.0 TV BOX  users will have to agree that the GADMEI software installation really sucks big time, with a capital S. This is because the whole device is made in China and its drivers and software are rendered 'untrusted' by Windows due to non standard certificates. [Even though they work perfectly under optimal fixes.]


      The saddest part is, that it is not entirely based on an english language interface either, so most people will NOT get the much needed 'help'. The help & support at GADMEI sucks big time too! So, we GADMEI user folks had to develop our own way to overcome this problem.

      I'm sure users have had problems installing the TV BOX in Windows 7 OS platform. It is fairly simple with Windows XP and Vista, but sometimes, it won't work too!

      So to sum it up, thats why  GLP  brings you a nifty trick to overcome this problem.

      NO big bulky downloads, NO useless files. 
      Just a nifty trick, some very small size file downloads and we're good to go!

       NO [.exe] files either, so you don't risk a malware or virus [Its tested] 

       Follow this easy set of instructions:

      FIRST, GET THOSE NECESSARY FILES BY CLICKING HERE(NOTE: This is an EXTERNAL LINK because we are not able to provide and update proper links at this time. Please get all necessary files from this place. )

      The REAL REASON(if you HAVE to know):
      Sorry, we are unable to provide download links at this time. GLP is the pioneer for providing faultless Driver updates for Gadmei for the past couple of years; which is why our content has been stolen and in some cases, copied word-by-word in many sites. This has increased our download payload and crashed our links on this page several times. It has gotten difficult to maintain download links over time in thissite so we have moved THIS CONTENT to CSITauthority . You can download all necessary files there without fail and you will also get responsive support. We are sorry for the inconvenience!
      [There is a 20GB download limit on these^ files so when lots of people download it, the link crashes. We are working to fix this issue(namely get a better server :v ) but for now, if it crashes, please let us know in the comments below. Thanks! ;) ]


    • Extract the files from  USB TV BOX 3.0[GLP].zip , and install GADMEI USB BOX 3.0 software (Yes it says 3.0, but the device is actually 2.0, it supports both). Install by running  autorun.exe  inside the extracted folder.


    • If you run Windows XP, restarting the system will work fine after install. Same for Vista. Thats all for XP & Vista.


    • If you are running Windows 7, do not restart yet!


    • Extract  Win7Drivers[GLP].zip  and paste the files inside the same folder where you installed the TV box software in Step 2.
       example: If you installed in E:\Gadmei , paste it inside that folder. 


    • Now go to Control Panel > Administrative Tools > Computer Management > Device Manager > Select the 'USB TV DEVICE' with a question mark sign.


    • Right click on it & select 'Update Driver Software' > Browse my computer for driver software > 'Browse' and select the place where you pasted all the  drivers extracted in Step 5.   In my case, E:\Gadmei 


    • Okay then, thats it! Congratulations, you have succeeded in fixing your 'wittle' GADMEI problem in Windows 7.

    • Do share and spread this to let more people know & help them!
      Bookmark us to solve your problems for FREE,
      lose your problems at GLP.

      Still confused? Hit me up in the comments and I'll solve your problems in a jiffy!
      Flying Bird Widget