Search This Blog

Showing posts with label Windows. Show all posts

Monday, December 22, 2014

Adobe Photoshop CS6 Portable - NO INSTALL REQUIRED


After the much popular Adobe Photoshop CS3 Portable, The new CS6 is here!! 

Adobe Photoshop CS6 Portable - is a fully portable version of Photoshop which can run easily without installing it on a computer. CS6 portable combines the portability and ease of the CS3 with all new features.

The new features include array of new tools in the toolbox including better quick select, mask, filter and rendering tools. 

 [Verified internal download, with private hosting.]
>> DOWNLOAD ADOBE PS CS6 PORTABLE by clicking HERE <<

[Other internal Links]
Click on any of the download links below to start downloading. [IDM Supported] 

Download Link: Mirror1 - [hosted at:glplance001] [Server is down]
Download Link: Mirror2 - [hosted at:glplance002] [Server is down]
Download Link: Mirror3 - [hosted at:glplance003] [Active Link]

[Download by Clicking any link given above]


Why you should go for it:
  • No registration is required.
  • No Installation is required and loading time is similar to installed version. 
  • It is very light weight and portable too, so It is a handy tool. 
  • This version is preactivated without cracks and totally FREE too. 
  • It is packed with lots of powerful and handy features. 
  • **Works remarkably with computers having very low RAM**
    (Tested with computers having 512MB RAM and 8GB RAM with no lags)
  • All these features come in a small package of only [688MB], which fits easily in any modern day USB [Flash Drive/ Pendrive/ Memory Card].
  • Faster Download!! We at GLP have highly compressed these [688MB] into just [286MB]. So you can download faster (^_^)
  • It is indeed a golden find! You should Download it immediately!

*The setup is easy and there should not be any trouble. However incase of any troubles, please feel free to ask in the facebook comments below(visible with Computer).


Saturday, August 2, 2014

Can't Install C / C++ in 32-bit / 64-bit system? Dont worry! Solutions here!!

Hey ya! Long time no see. I've had little time to post these days. Anyways onto the popular question...

HOW TO INSTALL C++ IN A 64-BIT SYSTEM??

Many have faced compatibility issues while trying to use the all so popular Borland C++ 5.02 (or lower/higher version) mainly because they were made a LONG time ago with the computers of 1970's in mind... so yes most 64-bit computers face problems today.

To solve this, use a compatible version like Dev-Cpp . It does all the work of your all-fav program and some more ^_^

Here's an [EXTERNAL LINK] (download). Grab it if you're in a hurry!
I'll provide a internal link soon. stay tuned!! ^_^

So yeah, use it and enjoy. Ask me freely if any problems persist.

Friday, May 30, 2014

I.C.E - Login Controller Program

Download link:  CLICK HERE TO DOWNLOAD ICE
[ Click here to know how to use ICE ]
What is I.C.E ??
Introduction:

I.C.E. - Intelligent Control Engine is a login control program that intelligently manipulates the amount of time that the user is allowed to use the computer.


Let there be a two-user scenario where USER1 be the 'Parent' and USER2 be the 'Child'

It begins with an initial setup which assembles all the necessary files together and optionally allows the user to enter a custom time interval for login timeout. The default value is 3600seconds i.e. in exactly 1hour time, the program displays a warning message (for 60 seconds) that the computer is about to log off. After the timeout of the warning message, the program proceeds to forcefully logoff the computer. This program is built keeping Parents in mind, as end-users.

In practical approach, this program is useful to Parents since it limits the amount of computer use for their child automatically! This program is based off some similar parental control programs that are available for purchase online and are quite expensive. Besides the primary function, this program is loaded with other functions such as Generating a Key which lets the Parent use the computer in case of an emergency.

The Keys are basically automatically generated unique files. The Keys that are generated are unique every time so that the USER1:Parent can always 'Generate' a different key if the previous one comes into the possession of the USER2:Child. Using a key is easy as all one has to do is paste the file 'ky.ice'(this is the key file) to his/her pendrive. Even if the time-limit is over, the program checks for possible USB drives connected to the computer having this file and verifies it against a copy in the program database. If a match is found, the logoff is aborted for the session. Automatic logoff can be re-assigned simply by plugging off the device and logging off manually.
Working Methodology:

The program works in a 3 tier process. It is basically a program that executes any one of the 3 sets of processes at a time.


When the program is first loaded, it works normally by logging the initial time and date (a1) & then logging the next set of time and date (a2) every five seconds. At the end of every five seconds, it checks whether the difference of current time and initial time has exceeded timer value(3600sec or custom) or not. If not exceeded, the program loops to the begining.

If the program is interrupted (say by power-failure) during its first tier, then the second tier of the program will load when the same program is run again. When the program is started for the second time after interruption, the program automatically checks for time differences i.e if the program got interrupted at the 30th minute, it will automatically resume from the 31st minute. This is quickly calculated by finding the difference of time_a2 and time_a1 from the previous tier.

If the program is interrupted yet again (i.e multiple interruptions), the porgram will not bother to calculate any difference. It will obtain the value of time remaining from the datafile that it created in the second tier.

At the end of any tier, before the end of the program, it displays a warning message for 60 seconds, after which the program verifies whether any USB is connected to the computer or not. It also checks whether the keys match or not. As long as the keys do not match, the logoff will commence forcefully(i.e disregarding all open programs and closing them automatically).

This is basically how the program is configured. It does not allow the user to use the computer more than the default(3600sec) or custom timeout limit everyday. Once the quota is finished for the day, no more use is allowed in the next login. The program automatically senses progressing year, month and day by comparing its database date and system date. If the program senses a new day, everything becomes reset and the program starts from the first tier again.

How to start using it?

  • Extract the 'ICE.zip' file
  • Double click on 'ICEmaker.exe' file
  • Follow the on-screen instructions.
  • Copy the Generated folder to any desired location in your computer. (Preferably not system drive)
  • Once copied, open the folder 'ICE' and double click on 'patch2start.bat'
  • Now the program gets activated.
  • Log off once and log back in to make it work for the first time.
Additionally:
  • Use the file called 'Chaabi.exe' to generate 'KEY' which will allow you to use your computer in emergency situations.
  • The same file 'Chaabi.exe' can also be used to set your own timer.
  • Note: Please keep Chaabi.exe somewhere secret in the future, to prevent its use by your child.
Features:
  • Different from default Microsoft Parental Control because this allows the child to use the computer at any time only for the specified period. 
  • Also has a resume function.
  • Separate unobstructed Login method for USER1:Parent.
  • FREE to use and distribute.

COMPATIBILITY: 
  • Works ONLY in 32-bit system
  • Works with Windows7 and Windows 8.1
  • Incompatible with Windows8
  • Untested for Windows XP
  • Does not require Administrator account.
  • Works in Standard as well as Admin account.
  • Does not activate when Deepfreeze or other such programs are operational.
Preview:
This is a previous version. This is pretty much what I.C.E. will do without customizing timeout. link: http://youtu.be/YuegsY1CXSA

SOURCE CODE: please contact the author directly if you require source code.

Download link:  CLICK HERE TO DOWNLOAD ICE


ANY QUESTIONS/ISSUES/QUERIES? JUST ASK BELOW!

Sunday, May 25, 2014

Collection of EVERY version of Qbasic/QuickBasic Released till date!

This is a list of some freeware programs in ascending order of recency. The older versions have  no compiler, meaning they CANNOT create  .exe  files that can run independently.


I had created a module to embed a compiler before, unfortunately I have lost it. I will resolve this issue in about a month's time by providing the patch. Sorry, I have entrance exams coming up, or I would have done this sooner. Expect a compiler in the month of October. Thanks for your patience.

List of all Qbasic/QuickBasic versions: click title to download

You can begin by following these tutorials:  
  • You can  press F1  anytime while running QBASIC and learn by yourself.

  • You can click HERE to download a home-made tutorial by NewKidWarren.
    I never knew, but apparently this is really popular in the QBASIC world.

  • You can click HERE to download Mallard's Tutorials.
    These tutorials are made by Mallard, the former owner of qbasic.com
  • You can click HERE to download Pete's Tutorials.
    These QBASIC tutorials were made by the owner or Petes Qbasic site.
Comments:

BatchFile1 - Login Controller Beta

NOTICE: There is ANOTHER version of this program which is better than THIS prototype made using DOS. The new program is made with C-programming language and is much easier to use. I made this new version for my class project. The program is now ready.
Have a look
> CLICK THIS LINK<


Here is the batch file that I made.  It controls login. It has a few bugs. I am too lazy to remove them. But this still serves as a good practice to start programming in DOS.

>> Click HERE to Download the batch program files in ZIP <<
{This file is uploaded on my PERSONAL Online Drive Storage, browser may say that its dangerous but it is just a false positive. }
.

ANY QUESTIONS? JUST ASK BELOW!

.
MORE ABOUT THIS>>>

 It was designed to let the user LOG IN with a user account for 1 hour. After 1 hour, the computer would log off automatically ( and no, I didnt use the simple shutdown command only  because people can deactivate it easily..my shutdown command works without any interval..u cant shut it down :P).
.
It HAS SOME BUG though... I realized it after testing it for a month. It was designed to let users use 1 hour in total...means they can use 5 min now...then 55 min later too... 
.
bugs are:
1. If they use 5 min... again 5 min... then login again... the timer resets.. ( I can fix it...but too lazy...its a pretty long code).
.
2. The program was also designed to reset itself after each day. Means, after one day, it detects that the computer has not been used for a day... and lets user login.... this works fine for a month... when the next month arrives... it shows error on resetting... problem was... I put codes in DD/MM/YYYY format... computer uses the format MM/DD/YYY ... simple error caused the computer to think thet the dates were same for the next month 
( I can fix this too...but I have also created a log file for this... that records all data of the program functioning... opening time..closing time... executing time... user tries to login after time out.. executed times ...error records...dates..etc etc..) ...so I am again too damn lazy to fix it 
.
.
Maybe I'll make a new batch program later. If u want the source code, I can give u all files in a zip file. Beware while using it though. If u put it in the startup folder...u will suffer only 1 hr access 
.
I originally made this program to control the computer time for my litte sister 
.
.
btw. Other variants of this are also possible...
for example, 
1. I am running a variant that requires me to make a .txt file with specific name... or my computer shuts down in 1 min.... only u will know this hidden password... so no one can access ur computer even if they can crack the password 
.
or, the one I created in grade 9
2. " Chaabi.bat "... it makes your pendrive a "chaabi" ie. "key"... If u dont plug it in..u cant logi in to your PC 
.
.
btw. All my programs are hidden with a wscript [.vbs] ... so that they run silently...stays hidden even from task manager 
.

UPDATE: All these bugs have been fixed and the latest perfectly working version of this program is available here[CLICK THIS LINK]

Sunday, April 13, 2014

How to solve IDM Integration Problems on Browsers?

IDM is a very nice tool to download stuff. It accelerates downloads over 5 times by simultaneously downloading the same file from different connections. It is simple to use and most efficient download accelerator out there.

BUT...

There's a big BUT here guys! IDM has the worst integration problems. IDM is works like an angel in some computers, while in some others it causes a massive headache due to cross-platform problems which causes the inability to integrate into the system or browser.

So, I'm here to give you a quick and nifty solution on that bugging integration problem on my favorite browser - Mozilla Firefox.

If IDM cannot automatically integrate, The simplest solution is that - WE DO IT!

So just close your IDM, exit it from the taskbar, and notification areas. Kill it from the taskmanager if a background IDM process is running. Then go to: THIS LINK(CLICK HERE)

Now, just install the IDM plugin and open it with Mozilla Firefox if your computer dooes not recognize it. Go to your Add-ons in firefox, and enable it. Then restart FIREFOX browser. Now Open IDM, then open Firefox. There you go! Now you have a full integrated IDM CC in your browser.

Cool thing is, you can still used your old CRACKED version of IDM, and just update the browser integration part. It WORKS LIKE A CHARM!

[Click to enlarge this pic]

Your comments are appreciated. 
Leave a comment if it was useful to you. 
Or, you can still leave a comment if you are confused by some steps and need a detailed walk-through.

 Comments: 

Saturday, February 8, 2014

Registry Thrash Key Finder Full Version FREE

Since many people have requested me to bring a FULL version of this software, I've posted it today. I know its late, but better late than never aye!

Okay so besides the chitchat, let me hurry up and give you the full version of Registry Thrash Keys Finder.  >Click me to Download in ZIP<


Additional Info on Registry Thrash Keys Finder: 


Registry Trash Keys Finder (TrashReg) is an advanced Registry cleaning tool. The main function of RTKF is to allow the removal of unnecessary keys from the Windows Registry. Many programs leave keys in the Registry, even after programs removal using an uninstallation facility provided with the programs themselves. RTKF allows you to decide whether to delete or leave the keys found. 

 Basically:
  • RTKF is a software that is able to locate the unnecessary registry entries stored on your hard drive, so that you can delete them.  
  • The interface of the program consists of a standard window and navigating through it is a simple job. 
  • Once you initiate Registry Trash Keys Finder, a scan is performed automatically.  
  • Here you can view the total number of found, selected, deleted and protected keys. 
  • Thus, you can copy or delete the key names, add them to a "protected list" (i.e. whitelist) or open a particular entry in the Registry Editor.  
  • Since backups are automatically created once you have deleted one or multiple entries, you can restore them at any time.  
  • In addition, you can toggle between the 32-bit and 64-bit mode, repeat the main search and search for null-embedded keys.  
  • Plus, you can save the contents of the registry entries, view the whitelist, sort the list according to date, type or name, disable advanced view, search for a key name on Google, as well as configure general options (e.g. interface language, automatic backups, automatic cleaning at Windows startup).  
  • The program uses a low to moderate amount of system resources and includes a comprehensive help file. 
  • All in all, Registry Trash Keys Finder is a very effective program for cleaning unwanted entries from your Windows registry.
 Requirements:      
  • Minimum of 16MB memory and about 1 MB of free hard disk space .

 Misc:   
  • Full support for Windows 8     
  • Important changes in Armadillo protection keys' search     
  • Added search routine for recent versions of EXEShield     
  • Added Italian user interface    
  • Added new sorting option - 'By description'     
  • Added search routine for the recent Alawar.com games' keys (FVO)
  • Many other changes, bugfixes and additions 

Guys, remember that although you are getting the FULL version here, this software is actually a DONATIONWARE. - means u actually need to donate some money to help the creator of this program. So you've got the full version stuff but if you still want to donate, you can click the link below to donate via paypal. Dontations are not fixed here. You can donate ANY amount you like.

https://www.paypal.com/cgi-bin/webscr?cmd=_s-xclick&hosted_button_id=CXJT6WQX55XZQ
https://www.paypal.com/cgi-bin/webscr?cmd=_s-xclick&hosted_button_id=CXJT6WQX55XZQhttps://www.paypal.com/cgi-bin/webscr?cmd=_s-xclick&hosted_button_id=CXJT6WQX55XZQ


Any Problems? Please comment if you did not understand the process of installing RTKF correctly.. or any other confusion.

 Comments: 


Thursday, January 9, 2014

List of Some handy Programming Tools - With Download Links

Click on the program title below to download

List of C and related programming languages click title to download

»TURBO C++ fully functional with Windows 7
How to install this + Tutorial »Click here!

»Turbo C++ For Windows 7 & Vista - {Lance}  

»BorlandC++ 5.02 [GLP]


List of MS Basic PDS versions: click title to download

»MS Basic PDS (Professional Development System) 7.0 (also suggested)

»MS Basic PDS 7.1


List of VisualBasic versions: click title to download

»VisualBasic for DOS 1.0 (Standard Version)

»Visual Basic for DOS 1.0 (Professional Version)


List of all Qbasic/QuickBasic versions: click title to download

»QuickBasic 1.0

»QuickBasic 2.0

»QuickBasic 2.00

»QuickBasic 2.01

»QuickBasic 3.0

»QuickBasic 4.0

»QuickBasic 4.5 (recommended)

Full links with tutorial here » Click here!


Monday, January 6, 2014

FREE High Speed Cloud Storage and File Hosting.


Searching for a FREE & relaiable file-hosting service?
Dropbox is super fast, you dont need to worry about its sync speed.
It is also lightweight and it will not affect your browsing speed at all.

If you are searching for a FREE and reliable file-hosting service then DROPBOX might be just what you are looking for.

DROPBOX offers you upto 2GB of FREE online storage (Cloud Storage). You also have the option to get 100s and 1000s GBs of space by paying for it. The data stored in DROPBOX can be accessed with multiple devices and synchronized. So that you can work on the go.


DROPBOX comes with a handy desktop tool. After the program installs, it creates a SPECIAL FOLDER in your computer, called the DROPBOX folder. Any file that you put in this folder is automatically uploaded in your dropbox account. Sharing that file is also very easy! Just send someone that link, and they can download it!


You can also Install Dropbox in multiple computers and get your files available there! For instance, you keep your important files at home, and they will be automatically available in your office computer. If you make changes or modify data, dropbox will also record those changes in all connected computers.It will only upload changes on the second time, so its super fast.Cool huh?

BASICALLY, YOU ARE GETTING 2GB EXTRA RELIABLE SPACE FOR FREE!

You can also increase this space upto 16GB for FREE, by referral. If you ask your friends to join dropbox service by email, and they join it, you get additional 500Mb per friend FREE! You can also get much more FREE space by completing other tasks!

Whats Cool? You can also get extra 500Mb FREE just by getting a link from me!

Register for a DROPBOX account and Install a DROPBOX tool today!


CLICK HERE to REGISTER for DROPBOX

COMMENTS:

Friday, December 20, 2013

How to use programs in Fullscreen mode in Windows7 and higher OS?

For this post, we take the reference of Borland C as our desired computer program.

Borland C was originally a program developed for 16-bit computers. Today's modern computers generally come in 32-bit or 64-bit architecture. While older operating systems(OS) like Windows XP supports running of old applications freely in full screen mode, the newer versions of OS like Windows 7 and higher DO NOT support full screen by default.

For most programs, it is possible to change compatibility by right-clicking the application, selecting 'properties' and using 'window mode' instead of 'fullscreen'. But that is only a temporary solution. In programs such as Borland C, that is possible but NOT FEASIBLE because it certainly opens the program but you wont be able to RUN it. (i.e The black screen output wont appear)

The ultimate solution to this and many more older programs that are based on a 16-bit architecture is the use of DOSbox. DOSbox is a revolutionary program that can partially emulate an older computer. In simple words, DOSbox creates a 'older computer' inside your computer. In that mode, the program will work just as good as it would work on a 16-bit system. It is fully compatible.


Download links:

[Mirror]: DOSbox (official file mirrored)


[Mirror]: Borland C (mirror: original file)


How to use DOSbox?
After you install DOSbox, an icon like this will appear on your desktop.
Just click on that and a DOS based console like the one shown below will appear!


Here, [Z-drive] is the virtual drive that represents the 'old computer' created by DOSbox. It has limited resources, which can be adjusted if you desire.

To use any program, you must first MOUNT it in DOSbox.

Basically, mounting means creating another virtual drive. DOSbox has only one virtual drive [Z-drive] at the begining. For DOSbox, there is no C-drive, D-drive or any other drive in your computer.

How to Mount?
 
If your program is in this location:  D:\BorlandC\bin\bc.exe  
then you should first mount D-drive.

To do this, type  Mount d d:\  in DOSbox and hit Enter key!
Then, you should get a message after this.


The command   Mount d d:\  will create a virtual D-drive and load the path D:\ inside it. That means the virtual D-drive will also have everything inside D:\ (which is the original D drive)   

You can change  to any other letter to change virtual drive letter.
 d:\  is a path and it MUST exist in your computer. Since my program is stored in D:\BorlandC , I chose D:\ as my path. You can choose a different path for your computer.          

Now to open that program, first go to the virtual drive you just created.
I created 
d:  so I simply type d: and hit Enter-key
After you hit enter, you will enter that drive. Look I just entered D-drive. Previously I was at Z-drive.

To open the program, simply type its path.
For me that is, D:\BorlandC\bin\bc.exe 


Now as you hit ENTER-key, your program will open.
You can use it in Fullscreen mode by using the key combination  Alt + Enter   

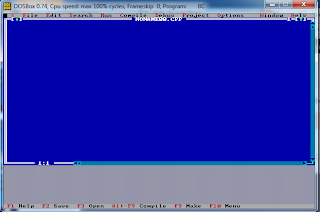
Borland C opens like this (In its default mode), 


you can start using it by using the key combination  Alt + F + N  which opens a new file to start working with!

It should look like this:


+This part of the article is added because a friend of mine pointed out something really interesting.
 

He asked:  Do I need to give the source path Every time " .

The answer is Yes if you follow this method. But after you get acquainted(familiar) with this method, you can try a simple trick to make this happen automatically. It is a simple batch processing trick that commands DOSbox to perform a series of actions.

To automate this Process for future use, refer to the follow-up post here!

Any Queries? Any Confusion? Need help?Feedback?
Just Drop a Comment!


How to Automate DOSbox? - GLP exclusive solutions!

DOSbox is a really VERY useful application. No one can deny that simple fact. But users will admit that opening, mounting and loading a program every single time is quite tedious and frustrating. To overcome this problem, GLP brings you a nifty trick to automate the programs that you use frequently.


A simple process will be explained in this post. You do NOT need any programming concept to do this. Just follow the instructions.

Okay, first if you are unfamiliar with DOSbox, please check out THIS POST at GLP.

We will be learning how to open BorlandC automatically in this post. You can replace the path to open your desired program in the same way.

 Step1: 

open notepad and type the following:


mount d d:\
d:\borlandc\bin\bc.exe
pause

then save as  BCM.bat 


 Step2: 

Now, put the file  BCM.bat  inside the main folder where you have installed DOSbox.

I installed my DOSbox in  E:\Installed\DOSbox  so, my path is:

 E:\Installed\DOSbox\DOSBox-0.74  <- This is where I would keep BCM.bat


 Step3: 


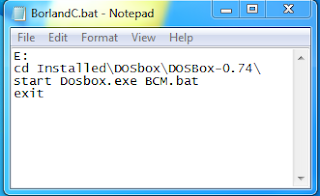
Open Notepad again, and type the following codes:

E:
cd Installed\DOSbox\DOSBox-0.74\
start Dosbox.exe BCM.bat
exit

then save it in your  Desktop  as  BorlandC.bat 

 Step4: 


You can now double click on the  BorlandC.bat  icon from your desktop to run Borland C. It will automatically open Borland C through DOSbox.


By following these  four steps , we can open any application through DOSbox automatically.

+ Full Screen support in Windows7


Hope you enjoyed this post! If you have any queries, problems, confusion, feedback - Just drop a comment below! Thanks!


Friday, December 6, 2013

How to make full screen support in windows 7 ?

Windows 7 is a great OS to use in general sense. But it does not provide the comfort and flexibility that XP does to programmers. Windows 7 does not support full screen mode, which renders several programs useless.

Some very useful programmes like QBASIC & Borland C can only start but not be able to run properly in Windows 7. This is because both are designed for older computers having a 16-bit architecture. Today's modern computers have 32-bit or 64-bit architecture of processors which cause compatibility problems.


The best way to overcome this problem is to create an 'old computer' inside your new one. There is a nifty tool called DOSbox that allows you to do it.


DOSbox makes a virtual 'old computer' inside your computer which lets us use older programs without a hitch. Its 100% compatible!
+ its 100% FREE!


To know how to use DOSbox, click here!


DOSbox can also be automated. You can automatically load the desired program with this trick.

To know this trick, click here!


Any Queries? Comment below!

Wednesday, August 14, 2013

Easiest way to Take Ownership of a File in Windows.

Taking ownership of system files or folders in Windows 7 or Vista is not a simple task. Whether you use the GUI or the command line, it takes far too many steps. 

Thankfully somebody created a registry hack that will give you a menu item for “Take Ownership” that will handle all the steps for you. (If you are the person that originally made this script, let me know and I’ll give you credit) 

Here’s what the new right-click menu will look like after installing this registry hack.


Install Feature:
Download and unzip the files contained in the zip file. Double-click the InstallTakeOwnership.reg file and click through the prompts. No reboot necessary.

Uninstall Feature:
Double-click the RemoveTakeOwnership.reg file and click through the prompts. No reboot necessary.

CLICK HERE TO DOWNLOAD TAKEOWNERSHIP.ZIP FILE

Why should you know how to take ownership of a file?
Well first and foremost, its because you own the OS that you use and you should be able to handle/modify all tasks in your OS. Wouldn't you agree?
Second reason is, sometimes some files will refuse to budge/modify or even read when you really need it. That's because those files are generally protected by the highest level of authority in the computer. So, if you wanted to edit a few components ina file to make youtube load faster, or maybe increase the speed of the internet you are using via a simple trick , then you would have problems if you do not have access to the files you want to manipulate.


Any more questions/queries? Please comment


Flying Bird Widget