Search This Blog

Showing posts with label Tricks. Show all posts

Thursday, September 10, 2015

How to fix Flashdrive / Pendrive whose contents are hidden automatically by shortcut virus or malicious script?

Ever faced a situation when you need to print something urgently from the College Library Computer and then to your horror you find out that all your files are missing? MOST LIKELY!

A malicious script is circulating around, causing this type of problem. The solution is quite simple. Basically, all the files have been moved into a nameless folder and then hidden as a system file so that we cannot see it normally. The solution is to just UNDO that process. Manually doing that can be a major PITA (specially if you have lots of Sub-folders). So we're doing the automated version with batch files.

What you need to do?
- Download the batch file that we've prepared
- Keep it in the infected folder

- Double click on it to run
- Your problem is solved! You're Welcome


Downloading is a bit troublesome though....

We have created a completely harmless file that just scrapes around for .vbs, .lnk, .tmp and traces of temporary docx files. Completely harmless to be honest! But Antiviruses pick up the false-alarm about it being a virus anyways (It has to do with the fact that it is a Batch file and is able to delete stuff).
There are a couple of workarounds to this:

DOWNLOAD METHOD #1
- Download the file as a text file (.txt) and Rename it after you receive it
- Press Windows Key + R
- Type "Control.exe folders"
- Folder Options>View> Advanced Settings
- Uncheck "Hide Extensions for known files"
- Now go back to where you downloaded Unhider+Cleaner.txt
- click once on the file and press F2 after it is highlighted
- Rename it from Unhider+Cleaner.txt to Unhider+Cleaner.bat
- done!
- Now just keep the file Unhider+Cleaner.bat in your pendrive and double click to use.

DOWNLOAD METHOD #2
- Download the file as a extentionless file and Rename it after you receive it
- Just keep the file in D drive
- Press Windows Key + R
- type cmd.exe
- type Ren D:\Unhider+Cleaner *.bat
- done!
- Now just keep the file Unhider+Cleaner.bat in your pendrive and double click to use.

METHOD #3
Open the file from METHOD#1 and using "Save As", save it as  Unhider+Cleaner.bat
- done!
- Now just keep the file Unhider+Cleaner.bat in your pendrive and double click to use.

METHOD #4
If you want the original batch file directly, by all means , go for it!
- Download the batch file directly
- Keep it inside the pendrive/folder you want to use
- Double click on the file Unhider+Cleaner.bat to use
- Since you have directly tries to use batch(.bat) from external source, your computer may warn you of a potential virus. Rest assured. We have included no such thing. This is intended to clean, not harm.

Working Output:

originally posted at: http://csitauthority.blogspot.com/2015/09/How2FixShortcutVirus.html

Any Questions? Feel free to ask...

Sunday, April 19, 2015

Tidbit 001 : How to make utorrent completely free of annoying ads

Utorrent is cool for everyone. It allows us to us torrents in the most optimized way. The basic version is FREE but at the cost of annoying ads everywhere on the UI. Here's a short tidbit to remove that once and for all! ^_^

To turn off utorrent ads and offers, 
  • open Options > Preferences > Advanced.
Here you'll find a large list of flags for the app and a filter box. 


Search for and disable the following flags:
  • offers.left_rail_offer_enabled / left_rail_offer
  • gui.show_plus_upsell
  • offers.sponsored_torrent_offer_enabled /sponsored_torrent_offer_enabled
  • bt.enable_pulse
  • gui.show_notorrents_node
  • offers.content_offer_autoexec
These flags may be named slightly differently depending on which version of the app you're using.

Tuesday, February 17, 2015

How to get a whopping 100Gigabytes of FREE online storage on ONEDRIVE

Hey you all, here's a late valentines gift for you! You can now get 100GB of FREE online space on ONEDRIVE for 2 years 
[Note: This is a limited period promotional offer. Grab it fast!!]

Okay, before I start rambling and all, here's few easy steps for those of you who just want it done without scrolling through a long list of sentences.


Here we go:
STEP1: If you DO NOT have a existing microsoft account  (i.e. hotmail or outlook or live account) , then click here to make one! . Those who already have it, please move to step2

STEP2: Then login to your microsoft account (i.e. hotmail or outlook or live account) . Once you have logged in, and you can see your inbox, proceed to step3

STEP3: Now click on THIS PROMOTIONAL LINK . Wait for the URL to resolve; then in a few seconds, you will be shown a message.

STEP4: Congratulations!! Now you have a whopping 100GB of storage for 2years @ absolutely NO COST (totally FREE!!)


NOTE: If STEP3's promotional link DOESN'T work for you, you need to read the things below to resolve this. Don't worry, its pretty easy! ^_^


More about this:

OneDrive is microsoft's cloud storage solution for the commercial platform. If you have used Google DriveDropbox or COPY, you know what I'm talking about already. Basically, a cloud storage means your personal online storage platform.

For those in the know, you should've also known that 15GB is as big as it gets for such FREE online services. 15GB offers are provided by Google Drive and COPY. However, in a sudden turn of events, microsoft has decided to give away, not just its conventional FREE 7GB, but instead a whopping 100GB for FREE to those who avail this offer. Again, if you are from NEPAL , you should get this offer with just a click(very easily, just like that). This promotional link should also support several other countries, but if your's is not on the list, don't worry just yet; GLP has a solution.

If step3 didn't work for you, here's a workaround for you...

Why doesn't STEP3 work for you? And how can you resolve it?
Answer: STEP3 simply doesn't work for you because you're in the wrong country. STEP3 is meant to work for NEPAL. But, don't worry yet! We have a fix for your country too!!

but first, a little background information:
Microsoft is giving away 100GB of OneDrive storage completely FREE of charge for 2 years in an attempt to lure in more users to buy Office365 and use WIndows10. It is an offer exclusive to the customers at the United States of America. However, we've found a little workaround and hence this promotional link in this article to get it even if you are not from the US.

So that's it huh? Not FREE for my country?
Answer: No NOT YET. Don't give up just yet. You can still change your IP Address to that of the United States, with the help of a VPN and then get this offer. >Click here to know how to change<

Alright! okay, enjoy your FREE 100GBs Everyone!!

Also, please tell me how it works out at your end. Are you from any other country besides NEPAL, and STEP3 still works for you? Let me know. Thanks!


Saturday, January 10, 2015

How to find ANY image on the internet? : Easy Walkthrough

Hello there!

This is a quick walkthrough that will teach you to find any image that you want on the internet. It is specially useful in these cases:

  • When you see a video tutorial on youtube or any other site and you want that awesome wallpaper that is used in the video.
  • You got a cool screenshot of a desktop in your facebook or social network feed, but not the original HD image.
  • You are new to desktop customization and cant find that special wallpaper shown in Rainmeter website or blogs.
Okay so without further ado, here's the problem and the solution:

Take a sample scenario (say you're watching Youtube video and you need a wallpaper from the video)


and you're wondering with this question:
 
  
Here's a solution for such a case: 

  •  STEP-1 : TAKE AN APPROPRIATE SCREENSHOT LIKE THIS:


  • STEP-2 : NOW GO TO https://images.google.com  AND PRESS ON THAT CAMERA BUTTON

  • STEP-3: SELECT "UPLOAD AN IMAGE" AND CLICK "BROWSE"

  • STEP-4 : SELECT YOUR SCREENSHOT AND CLICK "OPEN"


  • STEP-5: WAIT FOR A WHILE UNTIL FILE UPLOADS

  • STEP-6 : AFTER A WHILE, THE RESULTS WILL SHOW

  • STEP-7 : SCROLL DOWN ON THE RESULTS TO THE "VISUALLY SIMILAR" SECTION


    "EXACT MATCHES" AND "VISUALLY SIMILAR" MATCHES WILL BE DISPLAYED AS GIVEN ABOVE.
This way, any image that you come across, can be found on the web. Hope this was helpful to you.

Tidbit on How this stuff works:
In the past, google used to employ an algorithm to compare data contained in any two pictures. Differences in formats, brightness, tint and other properties could potentially create incorrect results. However, newer implementations and continuously perfecting this method has made results very accurate these days. The concept is to make a mathematical model of the image and compare it with indexed values of other picture data.
According to google,word-by-word: 

"The technology behind Search by Image analyzes your image to find its most distinctive points, lines and textures and creates a mathematical model. We match that model against billions of images in our index, and page analysis helps us derive a best guess text description of your image. Search by Image technology also includes the ability to match against images on the web so that we can show you similar images and webpages that contain your image."


Did this solve your problem?
Do you know some better way to search any image on the net?
Drop a comment below and let us know! ^_^

Friday, December 26, 2014

How to remove Android based 'com.android.patch' virus?

First of all, let me clear up something.
  • 'com.android.patch' is NOT actually a virus. 
  • In the original un-tampered form, it is an SSL patch created by the makers of android (GOOGLE inc.) to actually increase your internet browsing security.
  • So, its actually a GOOD thing
BUT, 
  • There exists a malicious version of this security patch.
  •  This version is created by hackers and they infect in your system when you install apps from a 3rd party source
    {Which means, when you install apps directly from the SD card or any other service which is NOT Google Play}

    ps. I got mine when I installed apps from mobogenie.

Here is an example of how that virus can affect you:


Solution to this: 

Before I discuss the solution to this problem, let me tell you how that happens and why that happens.

How does someone get infected?
  • You get infected when you install apps from Unknown sources, app that someone gave you over Bluetooth, some apps that you downloaded from some 3rd party website (Google Play is official; everything else is 3rd party.)
  • This virus has the same name as the official patch ('com.android.patch'), hence android security mechanisms may not recognize it if you enable 'Allow install from unknown apps'
  • After installing, this app acts like an official app and requests user to give it administrative permission
  • If you happen to absent mindedly give it permission to become device administrator, it can do nasty things like: Downloading apps without permission, crashing opened apps, populating RAM and SD etc.
Why does it operate? What is the purpose of this virus??
  • This code is generally harmless as long as it is not a device administrator.
  • But once you make it an administrator, it will basically own the device. You wont be able to remove it from the list of device administrators, it will force close 'settings' app whenever you try.
  • Theoretically, it can copy, manipulate, upload and abuse every bit of sensitive information on your phone such as: Login info, personal photos, bank details, contacts etc.
  • It operates to download loads of useless apps and makes profit by advertising those apps.

Big Question: How to REMOVE this virus?

Follow the easy STEPS below to remove your virus. If you do not want to preserve your installed apps, photos, videos and contacts, skip to STEP9 directly!
  1. First download 'Mobogenie' on your phone
  2. Now download 'Mobogenie Helper' which helps you connect your phone to your computer. 
  3. Now download 'Mobogenie for PC' in your computer.
  4. Open Mobogenie in your computer, and use Mobogenie Helper in your phone to connect your Phone with your computer.
  5. Use Mobogenie in computer, to backup all your installed apps in a folder.
  6. Also backup any photos, videos and other things that you require.
  7. Also, use Mobogenie in computer to backup all your contacts.
  8. Doing thins much will properly backup all necessary items in your phone.


    Follow the STEPS below to Hard Reset your device.
  9. In your android phone, go to Settings.
  10. Find 'Backup and Reset' under the 'PERSONAL' tab
  11. Tap on that option.
  12. Select 'Factory Data Reset'

  13. Your phone will ask for confirmation, allow it. 
  14. Now your phone will restart and reset itself.
  15. Depending upon the phone you are using and the amount of data to be cleared, it can take upto 15minutes.
  16. Upon resetting, your phone will restart once again
  17. On this startup, your phone will look and feel just as fresh as when you bought it newly.
  18. There will be no apps, contacts, files and such in your SD card.
  19. If you have followed STEPS 1-8 in this tutorial, you can use MOBOGENIE to recover back all your required data and apps.
  20. *Last tip* : Use your phone safely by allowing only trusted installs and always keep a backup available incase you need to hard reset again in the future.
Hope we helped you fix your device. Comment if any problem persists.

Saturday, August 30, 2014

LATEST PHISHING ATTACK -- BEWARE [GLP]

Hello guys, whats up? Have you received a strange new email from 'Paypal' recently, 
claiming that someone 'suspicious' might have been using your account? 


That screen there looks pretty legit don't it?
DONT BE FOOLED THOUGH


This is a phishing attempt by a group of hackers who are email bombing almost every random email address that may or may not have a paypal account. 

And if chances are they HAVE IT, and still HAVENT read this article, well they might just be treating the hardworking hackers to some hard earned cash at their expense.

SHARE this, Let people know. Save yourself, save those around you.

Write a comment on the facebook comment box given below. This will post it on your wall and let your friends know about it! ^_^


 Comments: 

Sunday, April 13, 2014

How to solve IDM Integration Problems on Browsers?

IDM is a very nice tool to download stuff. It accelerates downloads over 5 times by simultaneously downloading the same file from different connections. It is simple to use and most efficient download accelerator out there.

BUT...

There's a big BUT here guys! IDM has the worst integration problems. IDM is works like an angel in some computers, while in some others it causes a massive headache due to cross-platform problems which causes the inability to integrate into the system or browser.

So, I'm here to give you a quick and nifty solution on that bugging integration problem on my favorite browser - Mozilla Firefox.

If IDM cannot automatically integrate, The simplest solution is that - WE DO IT!

So just close your IDM, exit it from the taskbar, and notification areas. Kill it from the taskmanager if a background IDM process is running. Then go to: THIS LINK(CLICK HERE)

Now, just install the IDM plugin and open it with Mozilla Firefox if your computer dooes not recognize it. Go to your Add-ons in firefox, and enable it. Then restart FIREFOX browser. Now Open IDM, then open Firefox. There you go! Now you have a full integrated IDM CC in your browser.

Cool thing is, you can still used your old CRACKED version of IDM, and just update the browser integration part. It WORKS LIKE A CHARM!

[Click to enlarge this pic]

Your comments are appreciated. 
Leave a comment if it was useful to you. 
Or, you can still leave a comment if you are confused by some steps and need a detailed walk-through.

 Comments: 

Wednesday, January 29, 2014

UNBLOCK Country Based Youtube Block! - "This video is not available for your country" - Naa no more of that!

I discovered a hot new tool to unblock Youtube videos from country based blockades. I know more than just a few of us have seen the infamous "This video is not available for your country" sign more than once in this lifetime. Oh well, we've found a way around that using Proxy Server & Software earlier.

But the tool that I speak of today is amazing. When u use a proxy, it changes the IP address of your entire computer or browser. It can make browsing drastically slow and irritating. Even YouTube videos will stream much slower then. This tool however, does not compromise speed at all. 


It delivers a stunning performance with no lagging at all.
+ There is no hassle of finding the correct country> Changing settings and all those troublesome things. Now u can Just install a small plugin and enjoy. The "This video is not available for your country" will go away to be replaced with a smiling face.

Well lets not keep you waiting. You must be eager to use it. Go ahead and install this plugin in your Mozilla Firefox. I bet you'll like what u see ;)

>> Okay Now Click me to go to that page <<


Comment away with the comment box though!
Your Feedback = Cool things later = More Problems Solved!

Friday, December 20, 2013

How to use programs in Fullscreen mode in Windows7 and higher OS?

For this post, we take the reference of Borland C as our desired computer program.

Borland C was originally a program developed for 16-bit computers. Today's modern computers generally come in 32-bit or 64-bit architecture. While older operating systems(OS) like Windows XP supports running of old applications freely in full screen mode, the newer versions of OS like Windows 7 and higher DO NOT support full screen by default.

For most programs, it is possible to change compatibility by right-clicking the application, selecting 'properties' and using 'window mode' instead of 'fullscreen'. But that is only a temporary solution. In programs such as Borland C, that is possible but NOT FEASIBLE because it certainly opens the program but you wont be able to RUN it. (i.e The black screen output wont appear)

The ultimate solution to this and many more older programs that are based on a 16-bit architecture is the use of DOSbox. DOSbox is a revolutionary program that can partially emulate an older computer. In simple words, DOSbox creates a 'older computer' inside your computer. In that mode, the program will work just as good as it would work on a 16-bit system. It is fully compatible.


Download links:

[Mirror]: DOSbox (official file mirrored)


[Mirror]: Borland C (mirror: original file)


How to use DOSbox?
After you install DOSbox, an icon like this will appear on your desktop.
Just click on that and a DOS based console like the one shown below will appear!


Here, [Z-drive] is the virtual drive that represents the 'old computer' created by DOSbox. It has limited resources, which can be adjusted if you desire.

To use any program, you must first MOUNT it in DOSbox.

Basically, mounting means creating another virtual drive. DOSbox has only one virtual drive [Z-drive] at the begining. For DOSbox, there is no C-drive, D-drive or any other drive in your computer.

How to Mount?
 
If your program is in this location:  D:\BorlandC\bin\bc.exe  
then you should first mount D-drive.

To do this, type  Mount d d:\  in DOSbox and hit Enter key!
Then, you should get a message after this.


The command   Mount d d:\  will create a virtual D-drive and load the path D:\ inside it. That means the virtual D-drive will also have everything inside D:\ (which is the original D drive)   

You can change  to any other letter to change virtual drive letter.
 d:\  is a path and it MUST exist in your computer. Since my program is stored in D:\BorlandC , I chose D:\ as my path. You can choose a different path for your computer.          

Now to open that program, first go to the virtual drive you just created.
I created 
d:  so I simply type d: and hit Enter-key
After you hit enter, you will enter that drive. Look I just entered D-drive. Previously I was at Z-drive.

To open the program, simply type its path.
For me that is, D:\BorlandC\bin\bc.exe 


Now as you hit ENTER-key, your program will open.
You can use it in Fullscreen mode by using the key combination  Alt + Enter   

Borland C opens like this (In its default mode), 


you can start using it by using the key combination  Alt + F + N  which opens a new file to start working with!

It should look like this:


+This part of the article is added because a friend of mine pointed out something really interesting.
 

He asked:  Do I need to give the source path Every time " .

The answer is Yes if you follow this method. But after you get acquainted(familiar) with this method, you can try a simple trick to make this happen automatically. It is a simple batch processing trick that commands DOSbox to perform a series of actions.

To automate this Process for future use, refer to the follow-up post here!

Any Queries? Any Confusion? Need help?Feedback?
Just Drop a Comment!


How to Automate DOSbox? - GLP exclusive solutions!

DOSbox is a really VERY useful application. No one can deny that simple fact. But users will admit that opening, mounting and loading a program every single time is quite tedious and frustrating. To overcome this problem, GLP brings you a nifty trick to automate the programs that you use frequently.


A simple process will be explained in this post. You do NOT need any programming concept to do this. Just follow the instructions.

Okay, first if you are unfamiliar with DOSbox, please check out THIS POST at GLP.

We will be learning how to open BorlandC automatically in this post. You can replace the path to open your desired program in the same way.

 Step1: 

open notepad and type the following:


mount d d:\
d:\borlandc\bin\bc.exe
pause

then save as  BCM.bat 


 Step2: 

Now, put the file  BCM.bat  inside the main folder where you have installed DOSbox.

I installed my DOSbox in  E:\Installed\DOSbox  so, my path is:

 E:\Installed\DOSbox\DOSBox-0.74  <- This is where I would keep BCM.bat


 Step3: 


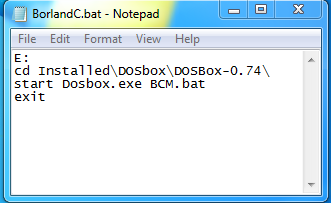
Open Notepad again, and type the following codes:

E:
cd Installed\DOSbox\DOSBox-0.74\
start Dosbox.exe BCM.bat
exit

then save it in your  Desktop  as  BorlandC.bat 

 Step4: 


You can now double click on the  BorlandC.bat  icon from your desktop to run Borland C. It will automatically open Borland C through DOSbox.


By following these  four steps , we can open any application through DOSbox automatically.

+ Full Screen support in Windows7


Hope you enjoyed this post! If you have any queries, problems, confusion, feedback - Just drop a comment below! Thanks!


Tuesday, December 10, 2013

Top 5 Youtube Tricks to make 'youtubing' more awesome than ever!


GLP brings you a list of the coolest Youtube Tricks to make youtubing more awesome than ever!! Get ready, I know you'll simply love it! I certainly did. So go ahead and read below.


Trick #001: Set a Specific Start Time


Most of the time, while sharing a video, u want people to focus on a certain specific part of the video. You usually do this by asking them to start the video from a certain point manually. However, this feature can also be made automatically. You are wondering how?


Its simple:

Lets say, you're watching this video:


Now, simply add,  #t=01m20s  at the end of the link & share!


For example; you need to share:

to start a video from 1 minute and 20 seconds.


 Trick #002: Set an Auto Replay Video


Want to keep repeating the video playback? Simply replace  youtube  with  infinitelooper  in your link.


For example; this link:

should be written as:


Trick #003: Super Boost Video Speed for Slow Connections


Have a slow internet connection? Tired of 'buffering' signs that pop out frequently? Want to stream videos faster? Well here's a solution.


Many users might not know but Youtube has announced a new feature specially aimed at users with slow internet connection. Its called 'Feather'. As the name suggests, it makes streaming, light as feather.

Your video speed is directly proportional to the number of bytes sent and received. 'Feather' mode removes all unnecessary data to give you ONLY pure videos and a tid bit of ad that is customary of a FREE service. That also means that some options are removed for that feature. But the overall streaming will see a positive result! :)


 Click here  to Try 'Feather' today (its currently in beta mode) ;)


Trick #004: Smart Accu-Search

Youtube has a LOT *I cant stress this enough* of videos. It is said that if one tries to watch all of them continuously, they wont finish for a good 3 century! (300 years of continuous videos). In such a platform of videos, searching a desired video may be a hassle.

But worry not, GLP brings u a solution. When ever u search for a video in Youtube, simply add   allintitle  at the begining of the keyword. This features to you, only the videos you asked for, no nonsense ;)


For example, instead of searching:
 nepali movies 

try searching:
allintitle nepali movies 


See the difference ;)


Trick #005: Magic Actions for Youtube

Here, there's something for the broadband users too! If you have a fast internet connection & enjoy watching videos in HD everytime, you can get an add-on for  Mozilla Firefox ,  Google Chrome  or,  Opera 15+  Its called  Magic Actions For Youtube  . Once you install it, enable HD option to enjoy HD. Always!

 +Very Cool Bonus featues like: 


  • Auto HD: Changes video to your desired video mode automatically.
  • Cinema Mode: Shades background for full video focus.
  • Adblock: blocks all annoying ads and pop-ups.
  • Volume Control: Scroll mouse to change volume easily.
  • Cool Day/Night Toggle: Shades youtube theme to white/black.
  • Watch delete view history.
  • Show enlarged avatars in comments and country flags.
  • Expand videos to full window size.
  • Auto Replay a video.
  • Hide Annotations(those annoying comments in the middle of the vid)
  • Auto hide player control: Controls are hidden, appear when u hover mouse over them.
  • Block/Hide comments if they annoy you.
  • Over all - Feels like one super awesome upgrade to youtube!
  • Its a youtube, you've always dreamed of! Try it and be amazed! ;)
Download Links:


Last but not the least: 

 #a Bonus 
This is an old age trick, but it could be new for some users who were unfamiliar with youtube a few years ago!

Add  &fml=5  at the end of Youtube video URL to solve high buffering rates.

Example: 
for this link: http://www.youtube.com/watch?v=U8STgCviLe0 


the link will be:
 http://www.youtube.com/watch?v=U8STgCviLe0&fml=5 


Friday, December 6, 2013

How to make full screen support in windows 7 ?

Windows 7 is a great OS to use in general sense. But it does not provide the comfort and flexibility that XP does to programmers. Windows 7 does not support full screen mode, which renders several programs useless.

Some very useful programmes like QBASIC & Borland C can only start but not be able to run properly in Windows 7. This is because both are designed for older computers having a 16-bit architecture. Today's modern computers have 32-bit or 64-bit architecture of processors which cause compatibility problems.


The best way to overcome this problem is to create an 'old computer' inside your new one. There is a nifty tool called DOSbox that allows you to do it.


DOSbox makes a virtual 'old computer' inside your computer which lets us use older programs without a hitch. Its 100% compatible!
+ its 100% FREE!


To know how to use DOSbox, click here!


DOSbox can also be automated. You can automatically load the desired program with this trick.

To know this trick, click here!


Any Queries? Comment below!

Monday, August 19, 2013

Facebook Trick : How to Easily invite ALL friends in a event? or to Like your Page?


Let's learn this one practically. If you can follow the steps below, you can definitely do this for your own page. Okay then follow the instructions below, 

and 

click on the images below to enlarge them!


Instruction1:

Go to this page &amp; like it : https://www.facebook.com/no2uniform

Then click on the "See All" link in invites tab.


Instruction2:

Click on "Recent Interactions" and mark on " Select All Friends" in dropdown category.

Keep scrolling down until you have the passed by the name of every single one of your friends.

Now, if you are using 
Google Chrome
 or its variant (Like Torch Browser):
Press Ctrl + Shift+J

If u r using 
Firefox:
Press Ctrl+ Shift+K

A console window should open . See next image.


Instruction3:

Click on "Console" tab in your opened window.


Instruction4:

Paste the code below in console & hit enter!

javascript:elms=document.getElementsByName("checkableitems[]");for (i=0;i<elms.length;i++){if (elms[i].type="checkbox" )elms[i].click()};


Instruction5:

After some time, you can see that all your friends have been selected!

Now close the console window only.


Instruction6:

After closing console window, click on "Submit" button


Instruction7:

You should get this message after following all steps. If not, please try all these steps with Mozilla Firefox or Google Chrome, or Torch Browser. 


Flying Bird Widget