Search This Blog

Showing posts with label How Stuff Works. Show all posts

Sunday, April 19, 2015

Tidbit 001 : How to make utorrent completely free of annoying ads

Utorrent is cool for everyone. It allows us to us torrents in the most optimized way. The basic version is FREE but at the cost of annoying ads everywhere on the UI. Here's a short tidbit to remove that once and for all! ^_^

To turn off utorrent ads and offers, 
  • open Options > Preferences > Advanced.
Here you'll find a large list of flags for the app and a filter box. 


Search for and disable the following flags:
  • offers.left_rail_offer_enabled / left_rail_offer
  • gui.show_plus_upsell
  • offers.sponsored_torrent_offer_enabled /sponsored_torrent_offer_enabled
  • bt.enable_pulse
  • gui.show_notorrents_node
  • offers.content_offer_autoexec
These flags may be named slightly differently depending on which version of the app you're using.

Saturday, January 10, 2015

How to find ANY image on the internet? : Easy Walkthrough

Hello there!

This is a quick walkthrough that will teach you to find any image that you want on the internet. It is specially useful in these cases:

  • When you see a video tutorial on youtube or any other site and you want that awesome wallpaper that is used in the video.
  • You got a cool screenshot of a desktop in your facebook or social network feed, but not the original HD image.
  • You are new to desktop customization and cant find that special wallpaper shown in Rainmeter website or blogs.
Okay so without further ado, here's the problem and the solution:

Take a sample scenario (say you're watching Youtube video and you need a wallpaper from the video)


and you're wondering with this question:
 
  
Here's a solution for such a case: 

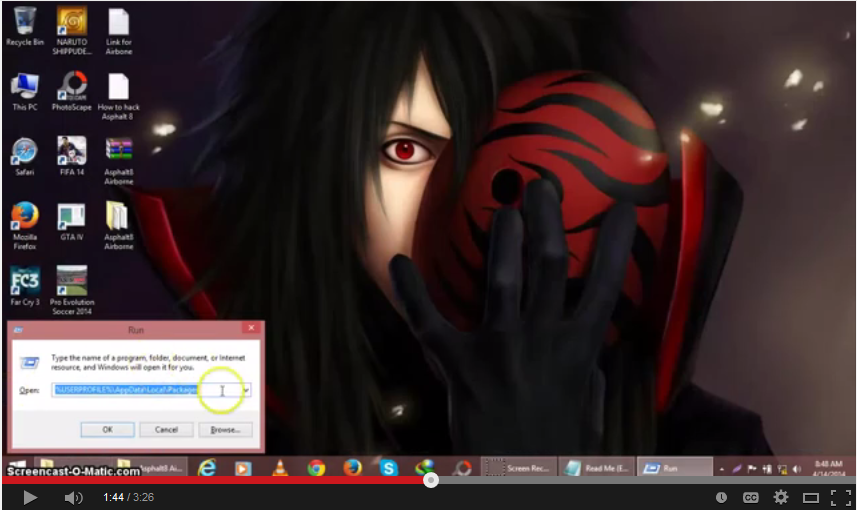
  •  STEP-1 : TAKE AN APPROPRIATE SCREENSHOT LIKE THIS:


  • STEP-2 : NOW GO TO https://images.google.com  AND PRESS ON THAT CAMERA BUTTON

  • STEP-3: SELECT "UPLOAD AN IMAGE" AND CLICK "BROWSE"

  • STEP-4 : SELECT YOUR SCREENSHOT AND CLICK "OPEN"


  • STEP-5: WAIT FOR A WHILE UNTIL FILE UPLOADS

  • STEP-6 : AFTER A WHILE, THE RESULTS WILL SHOW

  • STEP-7 : SCROLL DOWN ON THE RESULTS TO THE "VISUALLY SIMILAR" SECTION


    "EXACT MATCHES" AND "VISUALLY SIMILAR" MATCHES WILL BE DISPLAYED AS GIVEN ABOVE.
This way, any image that you come across, can be found on the web. Hope this was helpful to you.

Tidbit on How this stuff works:
In the past, google used to employ an algorithm to compare data contained in any two pictures. Differences in formats, brightness, tint and other properties could potentially create incorrect results. However, newer implementations and continuously perfecting this method has made results very accurate these days. The concept is to make a mathematical model of the image and compare it with indexed values of other picture data.
According to google,word-by-word: 

"The technology behind Search by Image analyzes your image to find its most distinctive points, lines and textures and creates a mathematical model. We match that model against billions of images in our index, and page analysis helps us derive a best guess text description of your image. Search by Image technology also includes the ability to match against images on the web so that we can show you similar images and webpages that contain your image."


Did this solve your problem?
Do you know some better way to search any image on the net?
Drop a comment below and let us know! ^_^

Monday, December 22, 2014

Adobe Photoshop CS6 Portable - NO INSTALL REQUIRED


After the much popular Adobe Photoshop CS3 Portable, The new CS6 is here!! 

Adobe Photoshop CS6 Portable - is a fully portable version of Photoshop which can run easily without installing it on a computer. CS6 portable combines the portability and ease of the CS3 with all new features.

The new features include array of new tools in the toolbox including better quick select, mask, filter and rendering tools. 

 [Verified internal download, with private hosting.]
>> DOWNLOAD ADOBE PS CS6 PORTABLE by clicking HERE <<

[Other internal Links]
Click on any of the download links below to start downloading. [IDM Supported] 

Download Link: Mirror1 - [hosted at:glplance001] [Server is down]
Download Link: Mirror2 - [hosted at:glplance002] [Server is down]
Download Link: Mirror3 - [hosted at:glplance003] [Active Link]

[Download by Clicking any link given above]


Why you should go for it:
  • No registration is required.
  • No Installation is required and loading time is similar to installed version. 
  • It is very light weight and portable too, so It is a handy tool. 
  • This version is preactivated without cracks and totally FREE too. 
  • It is packed with lots of powerful and handy features. 
  • **Works remarkably with computers having very low RAM**
    (Tested with computers having 512MB RAM and 8GB RAM with no lags)
  • All these features come in a small package of only [688MB], which fits easily in any modern day USB [Flash Drive/ Pendrive/ Memory Card].
  • Faster Download!! We at GLP have highly compressed these [688MB] into just [286MB]. So you can download faster (^_^)
  • It is indeed a golden find! You should Download it immediately!

*The setup is easy and there should not be any trouble. However incase of any troubles, please feel free to ask in the facebook comments below(visible with Computer).


Tuesday, July 15, 2014

Moore's Law and The Secret World Of Ones And Zeroes

This post content was copied from our next site - LibertyShared


Disclaimer: Please note that Liberty Shared does not own this video. This video was made by SciShow on Youtube. Liberty Shared has merely shared this video publicly for educational purposes.

Comments on this video:   
(Note: Comments will be synced to LibertyShared)


Saturday, June 14, 2014

Easy peasy steps to insert Facebook comment box in YOUR Blog

Follow these amazingly easy steps to start using facebook comment box in YOUR very own blog.
figure1(Click to enlarge)

Things you need to proceed:
  • A blog or your website
  • The awesome skill of copy/pasting
  • common sense
#How to do this for bloggers:
figure2 (Click to enlarge)

(STEP1) To start off, you need to be familiar with the bloggers dashboard. The figure1 shows a typical dashboard (click image to enlarge). 
  • You can go to the dashboard by clicking "Design" in the navigation bar when you are signed in.  OR,
  •  You can go to http://www.blogger.com, login with your gmail/blogger account and then select your blog from a list of blogs.
(STEP2) Now on the left pane of the dashboard, click on Template &gt; Then Click on 'Edit Html' button. See figure2 for visual instructions(Click image to enlarge)

(STEP3) Now you'll see a bunch of html codes... ignore it.. and just focus on your mission. Find the tag that looks like this:

<html b:version='2' class='v2' expr:dir='data:blog.languageDirection' xmlns='http://www.w3.org/1999/xhtml' xmlns:b='http://www.google.com/2005/gml/b' xmlns:data='http://www.google.com/2005/gml/data' xmlns:expr='http://www.google.com/2005/gml/expr'>

figure3 (Click to enlarge)

now unleash your amazing copy/pasting skill and paste xmlns:fb='http://ogp.me/ns/fb#' at the end of this code

finally it should look like this: (also see figure3)

<html b:version='2' class='v2' expr:dir='data:blog.languageDirection' xmlns='http://www.w3.org/1999/xhtml' xmlns:b='http://www.google.com/2005/gml/b' xmlns:data='http://www.google.com/2005/gml/data' xmlns:expr='http://www.google.com/2005/gml/expr' xmlns:fb='http://ogp.me/ns/fb#'>


figure4 (Click to enlarge)
(STEP4) Mission1 complete! Now moving to mission2!! 

Task: Locate "<body>" tag.

How to do that?
  • Press Ctrl+F and search for "<body " (.. not "<body>" be careful!)
  • Paste the whole code given here just below the <body> tag
CODE(below): 

<div id='fb-root'/>
<script>
//<![CDATA[
(function(d, s, id) {
  var js, fjs = d.getElementsByTagName(s)[0];
  if (d.getElementById(id)) return;
  js = d.createElement(s); js.id = id;
  js.src = "//connect.facebook.net/en_US/all.js#xfbml=1&appId=456615964434208";
  fjs.parentNode.insertBefore(js, fjs);
}(document, 'script', 'facebook-jssdk'));
//]]>
</script>


Finally it should look like figure4

(STEP5) By this point, your fb commentbox setup is ready! THIS IS NOT REALLY NECESSARY but If you want another 'extra' feature called the 'fb-recommendation-box' , you just need to add one more line of code just below the code given above! (See end of figure4)


<div class='fb-recommendations-bar' data-href='YOUR_BLOG_URL_HERE' data-read-time='30'/>

NOTE: Replace YOUR_BLOG_URL_HERE with the url of your blog.
for example, I replace it with
http://getlostproblems.blogspot.com


figure6 (Click to enlarge)
(STEP6) On the post where you want to USE the fb-comment box, make a permalink by clicking on the right pane. Now copy that permalink by selecting it and pressing Ctrl+C (see figure5 and figure6)
figure5 (Click to enlarge)


(STEP7) Now click on HTML for that post, and at the very bottom, paste these codes. (See figure6 and figure7)

<div class="fb-comments" data-href="YOUR_POST_URL_HERE" data-num-posts="10" data-width="400">
</div>


NOTE: Replace YOUR_POST_URL_HERE with the permalink you just copied!
for example, I replace it with
http://getlostproblems.blogspot.com/2014/06/insertfbcommentbox.htm


figure6 (Click to enlarge)
figure7 (Click to enlarge)


(STEP8) Mission completed soldier! Publish/Save the post and Chillax now!!


Did you like this post? 
Any Queries/Confusion/Feedback? Leave a comment below:

Friday, April 18, 2014

How does a contact form work?

Most contact forms these days have adopted PHP to make themselves work. Now php is a server based language and when your browser requests the server hosting it to open a php file, it gets executed instead. This is why you get a redirect or html file when you try to directly open a php file.

Scripting in HTML is platform dependent. I am using blogger to host this site. And since I'm using blogger, I cant really give you php demos here. This is because blogger does not support php. If I ought to buy a domain and build a website that supports php, I could run it just fine by hosting it on the domain using an ftp program like Filezilla.

So this is just a theoretical concept that I'm providing. The contact form that you see below is powered by an external 3rd party php. Its a free gadget that takes input and submits it to a file.

Sample of a Contact form: 

It sends messages to siddhantrimal@hotmail.com


Name *

Email *

Message*


Insider stuff: How is it working?
In the above contact form, the email address is written to a php file in their domain with the help of yet another php file while registration. Then it assigns the generated php file to this code which submits the data to the generated php file in that domain when we click "Send". The php file in that domain then emails the preset recipient(my email address).

 
PHP1-->generates PHP2-->This Form-->Sends data to PHP2-->PHP2 emails.
 

where, 
PHP1-->generates PHP2
happens only ONCE while registration on the host domain.


Taking input and submitting it to a file is done relatively easily with <form>.....</form> tags. In an analogy, it is similar to writing your Username, Email Address and any other information in a sheet of paper much like a form. Then there is the <input> tag which lets users to input data in a form enabling them to 'write' on a form. And finally there's the 'submit' value in 'type' atribute in  input tag i.e <input type="submit"> which lets the user to submit whatever it is written to somewhere else. The destination is mentioned while declaring the form as:
<form name="input" action="FormSub.asp" method="get">
which sends the input data fo Form.Sub.asp file

Similarly, if there is a php file hosted in the domain, it can be sent to that file or even a .txt text file. However, submitting to .php or .asp is beneficial because any third party wont be able to view information from it easily.


So in basic terms, the working mechanisms are:
-Make a form and include submit option
-The form sbumits data to another file

-The recepient file must be a script that can handle input and work accordingly.
-In a php supporting domain, the php is set such that it sends information to a preset email address.
-Hence a mail is sent.

Here's a demonstration on how information is sent from html to another file on the domain. However, this file on the domain WILL NOT send any email because it is not configured to do so. In a personal domain, the user can configure that by simply editing the php file to do task. Phishing sites work in this way.


So, in similar way, another form can be built to glean passwords from victims.
CLICK TO CHECKOUT A SAMPLE PHISHING FORM


Another method of sending emails could be 'mailto'. However, it is quite obsolete these days because it depends on your computers email client like Ms.Outlook Express. If your email client is NOT configured, it wont work at all. And since it is easy to just type http://hotmail.com to check out your email as we are not plagued by slow internet speeds of the dialup era anymore. Email clients were quite useful back at those days because they would store messages offline and messages could load faster than a browser. However that is irrelevant now because browsers load message in a few seconds these days...not much of a need for email clients. Hence they became almost obsolete along with mailto.

If your email client is setup, sending emails is easy as clicking this link

which says: mailto:testmail@domain.com?subject=TEST&body=TESTMSG


Friday, December 20, 2013

How to use programs in Fullscreen mode in Windows7 and higher OS?

For this post, we take the reference of Borland C as our desired computer program.

Borland C was originally a program developed for 16-bit computers. Today's modern computers generally come in 32-bit or 64-bit architecture. While older operating systems(OS) like Windows XP supports running of old applications freely in full screen mode, the newer versions of OS like Windows 7 and higher DO NOT support full screen by default.

For most programs, it is possible to change compatibility by right-clicking the application, selecting 'properties' and using 'window mode' instead of 'fullscreen'. But that is only a temporary solution. In programs such as Borland C, that is possible but NOT FEASIBLE because it certainly opens the program but you wont be able to RUN it. (i.e The black screen output wont appear)

The ultimate solution to this and many more older programs that are based on a 16-bit architecture is the use of DOSbox. DOSbox is a revolutionary program that can partially emulate an older computer. In simple words, DOSbox creates a 'older computer' inside your computer. In that mode, the program will work just as good as it would work on a 16-bit system. It is fully compatible.


Download links:

[Mirror]: DOSbox (official file mirrored)


[Mirror]: Borland C (mirror: original file)


How to use DOSbox?
After you install DOSbox, an icon like this will appear on your desktop.
Just click on that and a DOS based console like the one shown below will appear!


Here, [Z-drive] is the virtual drive that represents the 'old computer' created by DOSbox. It has limited resources, which can be adjusted if you desire.

To use any program, you must first MOUNT it in DOSbox.

Basically, mounting means creating another virtual drive. DOSbox has only one virtual drive [Z-drive] at the begining. For DOSbox, there is no C-drive, D-drive or any other drive in your computer.

How to Mount?
 
If your program is in this location:  D:\BorlandC\bin\bc.exe  
then you should first mount D-drive.

To do this, type  Mount d d:\  in DOSbox and hit Enter key!
Then, you should get a message after this.


The command   Mount d d:\  will create a virtual D-drive and load the path D:\ inside it. That means the virtual D-drive will also have everything inside D:\ (which is the original D drive)   

You can change  to any other letter to change virtual drive letter.
 d:\  is a path and it MUST exist in your computer. Since my program is stored in D:\BorlandC , I chose D:\ as my path. You can choose a different path for your computer.          

Now to open that program, first go to the virtual drive you just created.
I created 
d:  so I simply type d: and hit Enter-key
After you hit enter, you will enter that drive. Look I just entered D-drive. Previously I was at Z-drive.

To open the program, simply type its path.
For me that is, D:\BorlandC\bin\bc.exe 


Now as you hit ENTER-key, your program will open.
You can use it in Fullscreen mode by using the key combination  Alt + Enter   

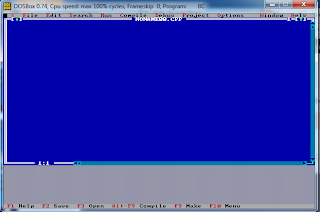
Borland C opens like this (In its default mode), 


you can start using it by using the key combination  Alt + F + N  which opens a new file to start working with!

It should look like this:


+This part of the article is added because a friend of mine pointed out something really interesting.
 

He asked:  Do I need to give the source path Every time " .

The answer is Yes if you follow this method. But after you get acquainted(familiar) with this method, you can try a simple trick to make this happen automatically. It is a simple batch processing trick that commands DOSbox to perform a series of actions.

To automate this Process for future use, refer to the follow-up post here!

Any Queries? Any Confusion? Need help?Feedback?
Just Drop a Comment!

How to Automate DOSbox? - GLP exclusive solutions!

DOSbox is a really VERY useful application. No one can deny that simple fact. But users will admit that opening, mounting and loading a program every single time is quite tedious and frustrating. To overcome this problem, GLP brings you a nifty trick to automate the programs that you use frequently.


A simple process will be explained in this post. You do NOT need any programming concept to do this. Just follow the instructions.

Okay, first if you are unfamiliar with DOSbox, please check out THIS POST at GLP.

We will be learning how to open BorlandC automatically in this post. You can replace the path to open your desired program in the same way.

 Step1: 

open notepad and type the following:


mount d d:\
d:\borlandc\bin\bc.exe
pause

then save as  BCM.bat 


 Step2: 

Now, put the file  BCM.bat  inside the main folder where you have installed DOSbox.

I installed my DOSbox in  E:\Installed\DOSbox  so, my path is:

 E:\Installed\DOSbox\DOSBox-0.74  <- This is where I would keep BCM.bat


 Step3: 


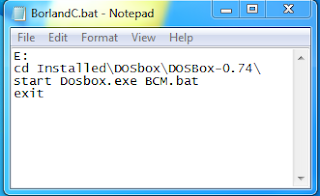
Open Notepad again, and type the following codes:

E:
cd Installed\DOSbox\DOSBox-0.74\
start Dosbox.exe BCM.bat
exit

then save it in your  Desktop  as  BorlandC.bat 

 Step4: 


You can now double click on the  BorlandC.bat  icon from your desktop to run Borland C. It will automatically open Borland C through DOSbox.


By following these  four steps , we can open any application through DOSbox automatically.

+ Full Screen support in Windows7


Hope you enjoyed this post! If you have any queries, problems, confusion, feedback - Just drop a comment below! Thanks!


Walkthrough: How to put Facebook comment box on blogs!

A brief walkthrough on the process of creating facebook comment box on blogs. 


Copy the highlighted part in your blogger template.

Note: It should be ONLY ONE. Don't do it if u have already done it before!


Instruction1:

On the html tag that looks like this:

<html b:version='2' xmlns='http://www.w3.org/1999/xhtml' xmlns:b='http://www.google.com/2005/gml/b' xmlns:data='http://www.google.com/2005/gml/data' xmlns:expr='http://www.google.com/2005/gml/expr' xmlns:fb='http://ogp.me/ns/fb#'>

Just paste the part highlighted in blue to the code that looks like the one above in your blog's template.


Instruction2:


Now copy the highlighted part just below the <body> tag .. find it by searching (Ctrl+F) the term "<body "

Copy/Paste the code from below! (highlighted blue+green)

blue part is the structure code. Some sites may give slightly different 
alterations but this one is 100% compatible for all cases tested so far!

green part is my own fb app called 'Commenterata'

<div id='fb-root'/>
<script> 
//<![CDATA[
(function(d, s, id) {
  var js, fjs = d.getElementsByTagName(s)[0];
  if (d.getElementById(id)) return;
  js = d.createElement(s); js.id = id;
  js.src = "//connect.facebook.net/en_US/all.js#xfbml=1&appId=573472319372353";
  fjs.parentNode.insertBefore(js, fjs);
}(document, 'script', 'facebook-jssdk'));
//]]> 
</script>

Instruction3:

Optionally, you can add a recommendations bar too by pasting the highlighted text given below. You have to paste it just below the code given at the previous instruction.

<div calss='fb-recommendations-bar' data-href='https://getlostproblems.blogspot.com' data-readtime='30' />

Now, 
  • replace https://getlostproblems.blogspot.com with your own website.
  • replace 30 with your desired time in seconds. This is a delay limit. If the user stays in your page for 30 seconds, facebook will automatically recommend some other pages to read. See a live example at this page.

Instruction4:

Now on your dashboard, go to Layout and select "Add a Gadget"


Instruction5:

Keep scrolling down until your reach 'Html/Javascript' title. Click on


Instruction6:

 Finally, add the code below here:

<div class="fb-comments" data-href="http://getlostproblems.blogspot.com" data-width="650" data-num-posts="10"></div>

Now, 
  • replace http://getlostproblems.blogspot.com with the page URL where ou want the comments to appear. 
  • To make the comment box active on THIS page that you are currently reading,
    I replaced the given URL with http://www.glpnepal.blogspot.com/2013/12/createFBcmntBox.html 
  • replace 650 with the width of the desired comment box. Recommended to be much less than the width of the page.
  • replace 10 with number of comments you want to display at once.

EXTRA NOTES:


  • Instead of following Instruction4 and onwards; You can just follow the first 3 instructions, then when you create posts, select 'HTML' near the 'COMPOSE' tab. Then add the code given at Instruction6 at the end of your HTML codes.


  • Important Note: After you paste this code, NEVER EVER save or select preview the page before publishing the page because fb registers a URL only once. If it is found offline on the first try, it wont be live and working later.


  • FEEDBACK
      Think something is still missing in this post? Tell us your problem/opinion. We'll fix it right away!

      Tuesday, December 10, 2013

      Top 5 Youtube Tricks to make 'youtubing' more awesome than ever!


      GLP brings you a list of the coolest Youtube Tricks to make youtubing more awesome than ever!! Get ready, I know you'll simply love it! I certainly did. So go ahead and read below.


      Trick #001: Set a Specific Start Time


      Most of the time, while sharing a video, u want people to focus on a certain specific part of the video. You usually do this by asking them to start the video from a certain point manually. However, this feature can also be made automatically. You are wondering how?


      Its simple:

      Lets say, you're watching this video:


      Now, simply add,  #t=01m20s  at the end of the link & share!


      For example; you need to share:

      to start a video from 1 minute and 20 seconds.


       Trick #002: Set an Auto Replay Video


      Want to keep repeating the video playback? Simply replace  youtube  with  infinitelooper  in your link.


      For example; this link:

      should be written as:


      Trick #003: Super Boost Video Speed for Slow Connections


      Have a slow internet connection? Tired of 'buffering' signs that pop out frequently? Want to stream videos faster? Well here's a solution.


      Many users might not know but Youtube has announced a new feature specially aimed at users with slow internet connection. Its called 'Feather'. As the name suggests, it makes streaming, light as feather.

      Your video speed is directly proportional to the number of bytes sent and received. 'Feather' mode removes all unnecessary data to give you ONLY pure videos and a tid bit of ad that is customary of a FREE service. That also means that some options are removed for that feature. But the overall streaming will see a positive result! :)


       Click here  to Try 'Feather' today (its currently in beta mode) ;)


      Trick #004: Smart Accu-Search

      Youtube has a LOT *I cant stress this enough* of videos. It is said that if one tries to watch all of them continuously, they wont finish for a good 3 century! (300 years of continuous videos). In such a platform of videos, searching a desired video may be a hassle.

      But worry not, GLP brings u a solution. When ever u search for a video in Youtube, simply add   allintitle  at the begining of the keyword. This features to you, only the videos you asked for, no nonsense ;)


      For example, instead of searching:
       nepali movies 

      try searching:
      allintitle nepali movies 


      See the difference ;)


      Trick #005: Magic Actions for Youtube

      Here, there's something for the broadband users too! If you have a fast internet connection & enjoy watching videos in HD everytime, you can get an add-on for  Mozilla Firefox ,  Google Chrome  or,  Opera 15+  Its called  Magic Actions For Youtube  . Once you install it, enable HD option to enjoy HD. Always!

       +Very Cool Bonus featues like: 


      • Auto HD: Changes video to your desired video mode automatically.
      • Cinema Mode: Shades background for full video focus.
      • Adblock: blocks all annoying ads and pop-ups.
      • Volume Control: Scroll mouse to change volume easily.
      • Cool Day/Night Toggle: Shades youtube theme to white/black.
      • Watch delete view history.
      • Show enlarged avatars in comments and country flags.
      • Expand videos to full window size.
      • Auto Replay a video.
      • Hide Annotations(those annoying comments in the middle of the vid)
      • Auto hide player control: Controls are hidden, appear when u hover mouse over them.
      • Block/Hide comments if they annoy you.
      • Over all - Feels like one super awesome upgrade to youtube!
      • Its a youtube, you've always dreamed of! Try it and be amazed! ;)
      Download Links:


      Last but not the least: 

       #a Bonus 
      This is an old age trick, but it could be new for some users who were unfamiliar with youtube a few years ago!

      Add  &fml=5  at the end of Youtube video URL to solve high buffering rates.

      Example: 
      for this link: http://www.youtube.com/watch?v=U8STgCviLe0 


      the link will be:
       http://www.youtube.com/watch?v=U8STgCviLe0&fml=5 


      Flying Bird Widget